TinyMCE(4.x)ではリンク挿入ボタンや画像選択ボタンを押すとダイアログがポップアップ表示されますが、レスポンシブに非対応なため、iPhone や Android などのスマートフォンでは見切れてしまい全体を表示できません。
そこで、TinyMCE に用意されたポップアップウィンドウを利用せず、Bootstrap(v3) などで作った独自のモーダルダイアログを表示するプラグインを作ってみます。
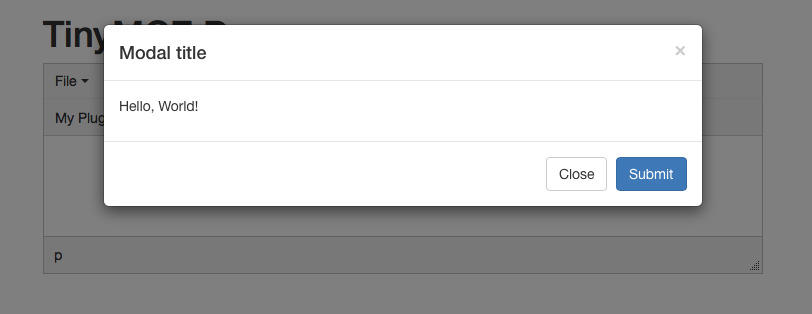
プラグイン名は「myplugin」で、ボタンを押すとダイアログが表示され、決定ボタンで「Hello, World!」という文字が挿入されます。
まずは tinymce/plugins/myplugin/plugin.min.js となるようにプラグインフォルダと JS ファイルを作成します。
plugin.min.js の内容は下記のとおりです。
tinymce.PluginManager.add('myplugin', function( editor ) {
	editor.addCommand('MyCommand', function() {
		window.myObj.open(editor);
	});

	editor.addButton('myplugin', {
		text: 'My Plugin',
		icon: false,
		tooltip: 'This is my plugin.',
		cmd: 'MyCommand',
	});

	editor.addMenuItem('myplugin', {
		text: 'My Plugin',
		cmd: 'MyCommand',
		context: 'insert',
		prependToContext: true
	});
});
editor.addCommand() でボタンやメニューを押した時の動作を登録します。コマンド名は「MyCommand」としましたが自由に一意な名前をつけて下さい。editor.addButton() でボタンが追加され、editor.addMenuItem() でメニューが追加されます。cmd には先ほどのコマンド名を指定します。
addCommand() を使わずにメニューやボタンに直接 onclick を持たせる書き方もあります。この場合コマンドは登録されないので execCommand() では呼び出せなくなります。
tinymce.PluginManager.add('myplugin', function( editor ) {

	editor.addButton('myplugin', {
		text: 'My Plugin',
		icon: false,
		tooltip: 'This is my plugin.',
		onclick: function(){ window.myObj.open(editor); }
	});

	editor.addMenuItem('myplugin', {
		text: 'My Plugin',
		onclick: function(){ window.myObj.open(editor); },
		context: 'insert',
		prependToContext: true
	});
});
TinyMCE を表示するフォームは次のようになっています。
<!DOCTYPE html>
<html lang="ja">
<head>
<meta charset="utf-8">
<title>title</title>
<script src="https://code.jquery.com/jquery-1.11.3.min.js"></script>
<link rel="stylesheet" href="https://maxcdn.bootstrapcdn.com/bootstrap/3.3.5/css/bootstrap.min.css">
<script src="https://maxcdn.bootstrapcdn.com/bootstrap/3.3.5/js/bootstrap.min.js"></script>
<script src="js/tinymce/tinymce.min.js"></script>
<script>
var myObj;
$(function(){
var editor;
myObj = {
init: function(){
$('#mySubmit').on('click', myObj.insert);
},
open: function(ed){
editor = ed;
$('#myModal').modal('show');
},
insert: function(){
editor.execCommand('mceInsertContent', false, "Hello, World!");
$('#myModal').modal('hide');
}
};
$(document).ready(function(){
myObj.init();
});
});
</script>
<script>
tinymce.init({
selector: '#wysiwyg',
plugins: ["myplugin"],
toolbar: "myplugin"
});
</script>
</head>
<body>
<div class="container">
<h1>TinyMCE Demo</h1>
<textarea id="wysiwyg"></textarea>
</div>
<!-- Modal -->
<div class="modal fade" id="myModal" tabindex="-1" role="dialog" aria-labelledby="myModalLabel">
<div class="modal-dialog" role="document">
<div class="modal-content">
<div class="modal-header">
<button type="button" class="close" data-dismiss="modal" aria-label="Close"><span aria-hidden="true">×</span></button>
<h4 class="modal-title" id="myModalLabel">Modal title</h4>
</div>
<div class="modal-body">
<p>Hello, World!</p>
</div>
<div class="modal-footer">
<button type="button" class="btn btn-default" data-dismiss="modal">Close</button>
<button type="button" class="btn btn-primary" id="mySubmit">Submit</button>
</div>
</div>
</div>
</div>
</body>
</html>
下記は TinyMCE の初期設定部分です。
selector にエディタを表示する textarea の ID を指定し、plugins に今回使用するプラグイン名「myplugin」を指定します。ツールバーにも表示する場合は toolbar にも指定します。
tinymce.init({
    selector: '#wysiwyg',
    plugins: [ "myplugin"],
    toolbar: "myplugin"
});
</script>
myObj.open() ではダイアログの表示処理を、myObj.insert() ではテキストエリアに文字を挿入する処理が行われます。open() 時にプラグインから渡された editor を受け取って保管しておき、insert() でそれを使います。editor.execCommand() は TinyMCE の各種コマンドを実行できます。今回はテキストの挿入なので mceInsertContent を使いました。その他のコマンドはこちらに掲載されています。(ver.3.x用)